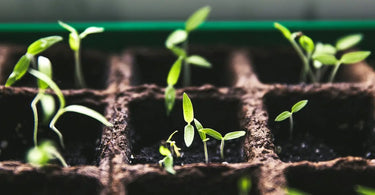
Seed starting is where you plant your seeds indoors in the spring to give them a jump start on the growing season, so you can grow earlier and get your fresh grown fruits and veggies on your table sooner! This post will give you some information on the perks of seed starting versus purchasing already-grown seedlings from a nursery.
Why start your own seeds?
1. Earlier harvests and blooms jump start your season and help you to enjoy the fruits of your labor earlier!
2. More for less... even after the costs of the seed starting supplies, growing your own plants to transplant in the ground when the temperature is warmer is still more cost effective. A packet of seeds only costs a fraction of what a tray or "flat" of flowers or seedlings grown by a nursery would cost.
3. You do your own quality control. When you start your own seeds, you know exactly how long they've been around before being planted, as opposed to seedlings started by a nursery, where you don't know how long they've been sitting around before you purchase them. You also control the quality of what you're planting. Any weak or stunted plants can be disposed of as opposed to being planted and failing.
4. Variety is the spice of life! Nurseries tend to only stock "tried-and-true" varieties, while if you start your own seeds, the possibilities are endless. The nursery may only stock 4 types of tomato seedlings, while ordering and planting your own seeds may give you the option of over 50 varieties.

Seed Starting At-a-Glance
Vegetables germinate best in warm soil. Whether starting your seeds indoor or outdoor, soil temperature plays a critical role in the success of your seeds. Below we've listed a few common vegetables with the time needed for them to sprout, temperature needed and when to plant them.
Sow broccoli seed 6 weeks before the last spring frost to 12 weeks before the first fall frost. Seeds sprout in 3-10 days at 70°-75°. Grow seedlings at 60°-70° soil temperature.
Sow cabbage seeds 8 weeks before last spring frost to 12-14 weeks before the first fall frost. Seeds sprout in 4-10 days at 70°-75°. Grow seedlings at 60°-70° soil temperature.
Sow cauliflower seeds 6 weeks before last spring frost to 12-14 weeks before the first fall frost. Seeds sprout in 4-10 days at 70°-75° soil temperature. Grow seedlings at 60°-70°.
Sow cucumber seeds 4-5 weeks before last spring frost. Seeds sprout in 6-10 days at 70°-80° soil temperature. Grow seedlings at 70°-80°.
Sow lettuce seeds 6 weeks before last spring frost to 9 weeks before the first fall frost. Seeds sprout in 4-10 days at 60°-75° soil temperature. Grow seedlings at 55°-75°.
Sow onion seeds 8-12 weeks before last spring frost to 17 weeks before the first fall frost. Seeds sprout in 7-12 days at 65°-80° soil temperature. Grow seedlings at 60°-70°.
Sow pepper seeds 8-10 weeks before last spring frost. Seeds sprout in 10-20 days at 75°-85° soil temperature. Grow seedlings at 65°-80°. Pepper seed takes longer to germinate than most seeds. The warmer the temperature, the faster they will grow.
Sow squash seeds 4-5 weeks before last spring frost. Seeds sprout in 3-10 days at 70°-80° soil temperature. Grow seedlings at 60°-75°.
Sow tomato seeds 5-7 weeks before last spring frost. Seeds sprout in 6-14 days at 75°-80° soil temperature. Grow seedlings at 60°-75°.
The last spring frost is climate dependent. Generally this occurs around the full moon in May for Northern states. As you go south, every 100 miles equals one week earlier on the calendar.

Your list of materials needed for a successful seed starting!
The first thing you'll need is a soilless mix/seedling mix. Potting soil can be too heavy for germination, so the soilless mix is your best alternative. Potting soil is also not ideal because it is more coarse and could include weed seeds or soil that hasn't been sterilized which can introduce disease or unknown/unwanted weeds to your own seedlings. Seedling mixes are very fine, allowing the tender new roots to spread out well and allows good water drainage. Potting soil can get water logged (overwatered) and can lead to seed rot or disease, such as damping off. Seed starting mixes usually do not have to enough nutrients to keep your seedling growing strong, so a fertilizer needs added down the line (see below).
Soilless mix is a sterilized mixture of peat, core fiber, vermiculite, perlite, and other material depending on brand. Being sterilized, the soilless mix helps prevent any diseases that might have been in any soil you would use.
A great organic seedling mix we recommend is the Coast of Maine Sprout Island Seedling Mix.

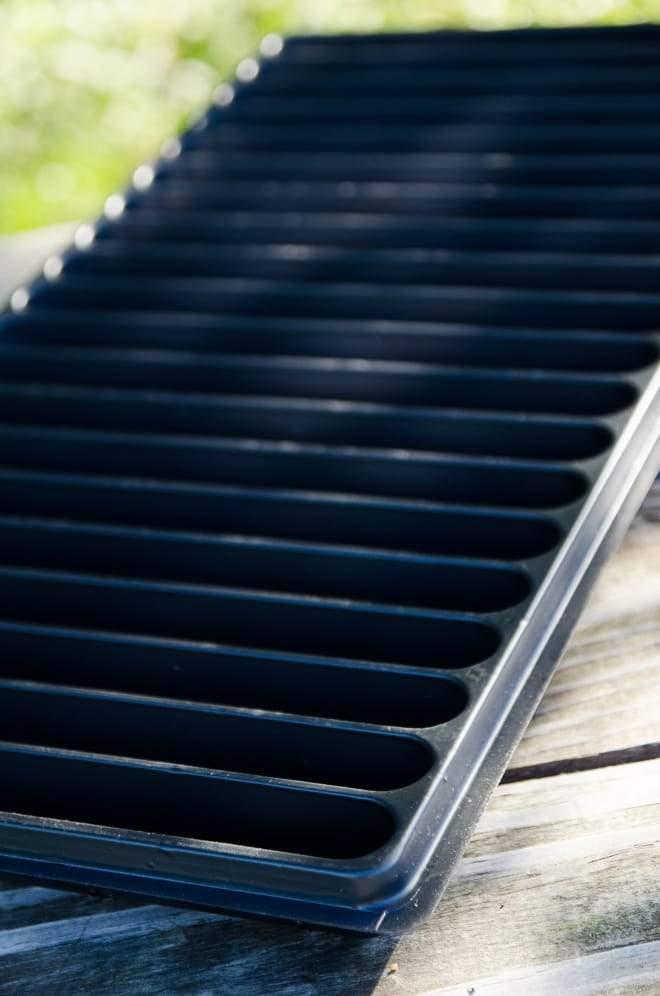
Jaci, our Trial Garden and Germination Manager, starts peppers, tomatoes, and flower seeds a 20 Row Seedling Flat. It is a great space saver for the first 4 weeks and easy to keep warm with a Heat Mat. An easy way to deposit seeds into your seedling flats is our Mini Seedmaster. They are then transferred into the Fiber Pack Strip.

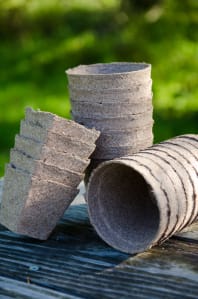
For squash, cucumbers, melons, and other similar veggies, Peat Pots (round) or Cow Pots (3 inch / 4 inch) work well, both of which can be directly planted into the ground. Peat Pots are plantable pots that are made of peat, vegetable fibers, and nutrients. Cow Pots are made of dry, composted cow manure that fully decomposes once planted with no waste or odor. Transfer the pots directly into the ground in 4-5 weeks.
A good way to give your seeds the warm soil temperature they need to germinate is our Seedling Heat Mat (Small / Large ). With a Seedling Flat and a Propagation Dome, you can create the ideal growing environment that your seeds crave.

The optimum time to start lightly fertilizing your seedlings is after the second to third set of leaves appear on the seedling, as the seed starting mixtures do not provide adequate nutrients.
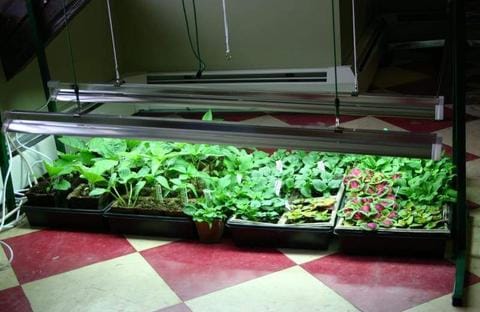
Another essential for the seed starting process is a set of Grow Lights (2 foot / 4 foot). They simulate sunlight where there is none and give your seedlings the amount of light they need to grow.
Check out our full selection of Seed Starting Supplies to customize your set up and GET GROWING!
This article was so helpful to a beginner
Can you confirm that your Black Gold Seedling Mix is sterilized? I don’t see that in the product information. Thank you!
I find all your articles so very interesting, but this one really hit it out of the park! Keep up the great work and thank you for all your helpful information.
HI Barbara! Yes all of our seeds are untreated. Thanks for asking!
Are all of your seeds untreated?
Thanks.