
One of the problems you may run into with growing your own food is simply having too much of it! You can only eat and give away so much, so an alternative is canning or preserving it! By canning your own fruits and veggies, you can save money and learn how to be almost completely self-reliant concerning food.
When you really break it down, canning is just food science. When you preserve food, you are basically freezing time. The simplest method of canning entails filling jars with acidic foods such as tomatoes, berries, fruit jams or jellies, or cucumbers in vinegar, covering them with lids and then boiling them in an open pot of water until the heat forms a seal under the lid.
Water Bath Canning Techniques
Boiling the jars in a water bath forces the air out of the food and creates a vacuum in the acidic environment that prevents bacteria from forming. High acid foods preserved with this technique should keep for at least a year.
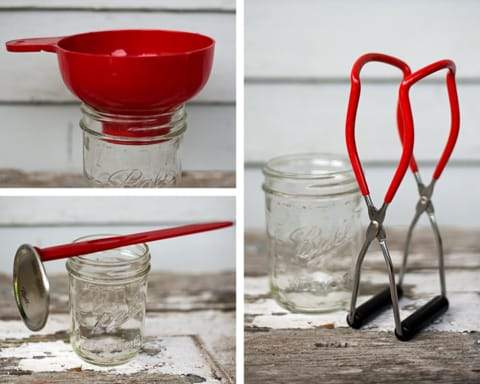
Water bath canning is a great place to start if you’ve never canned before, as it’s very easy and affords you a variety of options such as jams and jellies, whole tomatoes and pickles. The process is fairly simple, just requiring a clean work environment and the ability to boil water. The lids, rings, and jars themselves should all be boiled in a large pot prior to canning to ensure all bacteria has been eradicated. While boiling your jars, rings, and lids, prepare the product that will be going into your jars according to your recipe. After the product is ready to be canned, remove jars from boiling water, place them on a clean towel and carefully fill the jars with your product, leaving at least 1/2-1/4 inch space at the top.
Wipe the rims of the jars clean with a damp towel before screwing on the lid and ring. Return the full jars to the water you used to boil the jars initially, and once the water has returned to a boil, start the timer according to the recipe. You’ll want to use a jar lifter to insert and remove your jars into and from the boiling water, as the jars must remain upright at all times to allow for a proper seal.
Make sure to keep the water level well above 1-2 inches over the tops of the jars, especially for boil times of over 30 minutes. You may want to purchase a book on canning to ensure the proper boil times for the specific item you are canning. Your jars should remain completely covered by the boiling water at all times during the boiling process. If the water stops boiling or if the water does not completely cover the jars at any time during the canning process, you must bring the water back up to level and back to a boil before restarting the timer from the beginning.
After the timer goes off, turn off the heat and allow the jars to rest for 5 minutes before removing them from the water with your jar lifter. When the timer goes off, remove the jars immediately from the water and set them on a towel to rest. Soon after you should start to hear the “ping” of the lids sealing. Let the jars sit at room temperature for at least 12-24 hours before disturbing. After the jars have cooled completely, test the seals on the jars by removing the ring and gently prying at the lids. They should hold fast if the seal is good. These jars should last for up to a year. Any with seals that did not take should be refrigerated and used first.
The Pressure Canning Technique
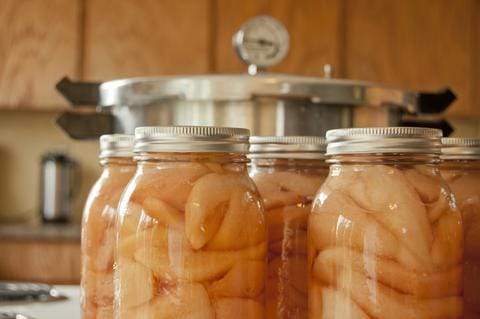
This requires a little more skill and specific equipment but provides a wider array of food and flavor options. When selecting your pressure canning equipment, keep in mind the size of the batches you intend to do. A large pressure canner is recommended, as most instructions on venting apply to standard large canners. Low acid foods need to be processed in a pressure canner in order to destroy any bacteria that may be present. In an effort to educate (NOT intimidate), I’ll briefly go over a particular bacterial risk called Botulism. Botulism is a rare and potentially fatal illness that causes paralysis. The toxin that causes it lives in soil and water, and is allowed to manifest when exposed to low oxygen levels and certain temperatures. The toxin is destroyed by being exposed to temperatures of more that 85 degrees Celsius for more than 5 minutes. This is why proper canning is so important. The acidity in high acid foods like fruits and tomatoes is optimum for killing the bacteria, so they do not require the same amount of steps that low acid foods do.
When using the pressure canning method, it is important to understand the science behind it. Pressure itself does not kill bacteria, only high temperatures applied constantly for an extended period of time can achieve this. Your canner must be operated at a gauge pressure of 10.5lbs, which provides an internal temperature of 240 degrees. Be aware that your canner must be properly vented before setting the timer. When putting water in your canner before use, be sure to abide by the measurements for the specific food you are canning, as they vary. A good starting point is 2-3 inches of hot water. Place your jars on the rack using your jar lifter, as the jars must remain upright at all times a fasten the lid securely.
When deciding which method to use, you must take into consideration the acidity level of the food you want to can. As mentioned before, high acid foods such as berries, tomatoes and cucumbers can be canned using the simpler water bath method. Red meats, seafood, poultry, milk and all other fresh vegetables need to be canned using the pressure canning method. It is important to note that while most fruits and tomatoes are acidic enough to use water bath canning, you must make sure that the pH level of your intended food is below 4.6. If your intended fruit or tomato is above 4.6, you must use lemon juice or citric acid in the canning process to lower the pH to the appropriate level.
The time frame on your canning relies on the acidity level and the kind and amount of food you have selected. Low acid foods can take anywhere from 20-100 minutes to pressure can, while high acid foods can take anywhere from 5-85 minutes using the water bath method.
A great resource of information on canning is the Ball Canning Website for beginner canning methods as well as many tried and true recipes.
Below is a selection of books that we offer concerning canning and preserving. They include tips and tricks, basic information, as well as many recipes.
Pinetree's Book Selection for Canning & Preserving
Harvest is supposed to be the good part! You worked hard for this, so here are five easy ways to get the most out of what you can’t eat right away.
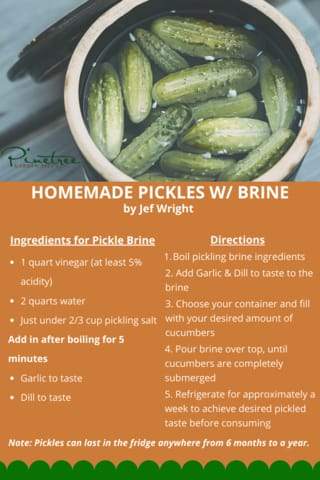
Homemade Pickles
Refrigerator Pickles are another option that does not require a lot of work. These pickles are meant to be kept in a fridge and eaten rather quickly as opposed to stored for the long haul. Cucumbers, carrots, beans, beets… you name it, you can refrigerator pickle it! There are many recipes and methods that have been tried and touted over the years, so we’re providing a recipe used by a previous Pinetree Employee!
Canning & Preserving Fresh Salsa
Tomatoes are something that we always seem to have too many of by the end of the summer. You can only eat so many, and can only give away so much! One yummy option is salsa, fresh, frozen or preserved! Again, there are many, many recipes with endless variations, so we’ll just share a basic fresh/frozen recipe that we’ve had luck with so you can modify it to your own tastes! It all starts with the tomatoes, of course! Roughly chop around 6-7 good sized (baseball-softball size) tomatoes in order to make about 6 pints of salsa.
Everything gets pulsed through a food processor to achieve that chunky salsa goodness. For flavor, we added around 2 tablespoons of lemon juice, a tablespoon of dried thyme, a tablespoon of dried oregano, a tablespoon of dried basil and salt and pepper to taste. Stir it all together and take a taste, add what you think it needs more of if needed!
After mixing it all together and putting your stamp of approval on taste, measure the salsa into 6 pint-sized mason jars. Refrigerate immediately, enjoy the fruits of your labors with some tortilla chips, and give some to a happy neighbor!
If you make a large batch and don’t think you’ll consume it all, you can purchase freezer-safe containers to fill with your fresh salsa and store the excess in the freezer!

If you have a favorite canning or preserving recipe, feel free to share it in the comments section below!
If I pickle foods on the counter, can I then can them in a water bath canner? I don’t like the idea of always using vinegar.
Rebecca is right! We, too, have decided to forego 50% of our garden space dedicated to flowers to include new crops of veggies. We are trying leeks, kohlrabi, bush type limas and some fresh new herb varieties this year. Just a little self reliance can go a long way. I enjoy your occasional emails about gardening and look forward to spring and summer months more enthusiastically this year, especially.
Our family thanks you for keeping in touch and I suspect it helps keep your spirits a little lighter in this crisis. Husband and I discussed this idea I had and started sharing on facebook. This year we are not planting annuals in our flower beds, instead we are putting vegetables. I have been canning and selling our jams jellies salsas and sauces for many many years .Today I will go back on FB and offer some of our inventory for free as well as making small packets of seeds that include everything to make pickles salsas sauces and jams. We’re all in this together . thank you and your staff for all you to provide us with organic high quality seed and recipes to help us feed our families. cheers and happy gardening.
Rebecca Zajac 1-807-622-6605